
User Manual
INDEX
|
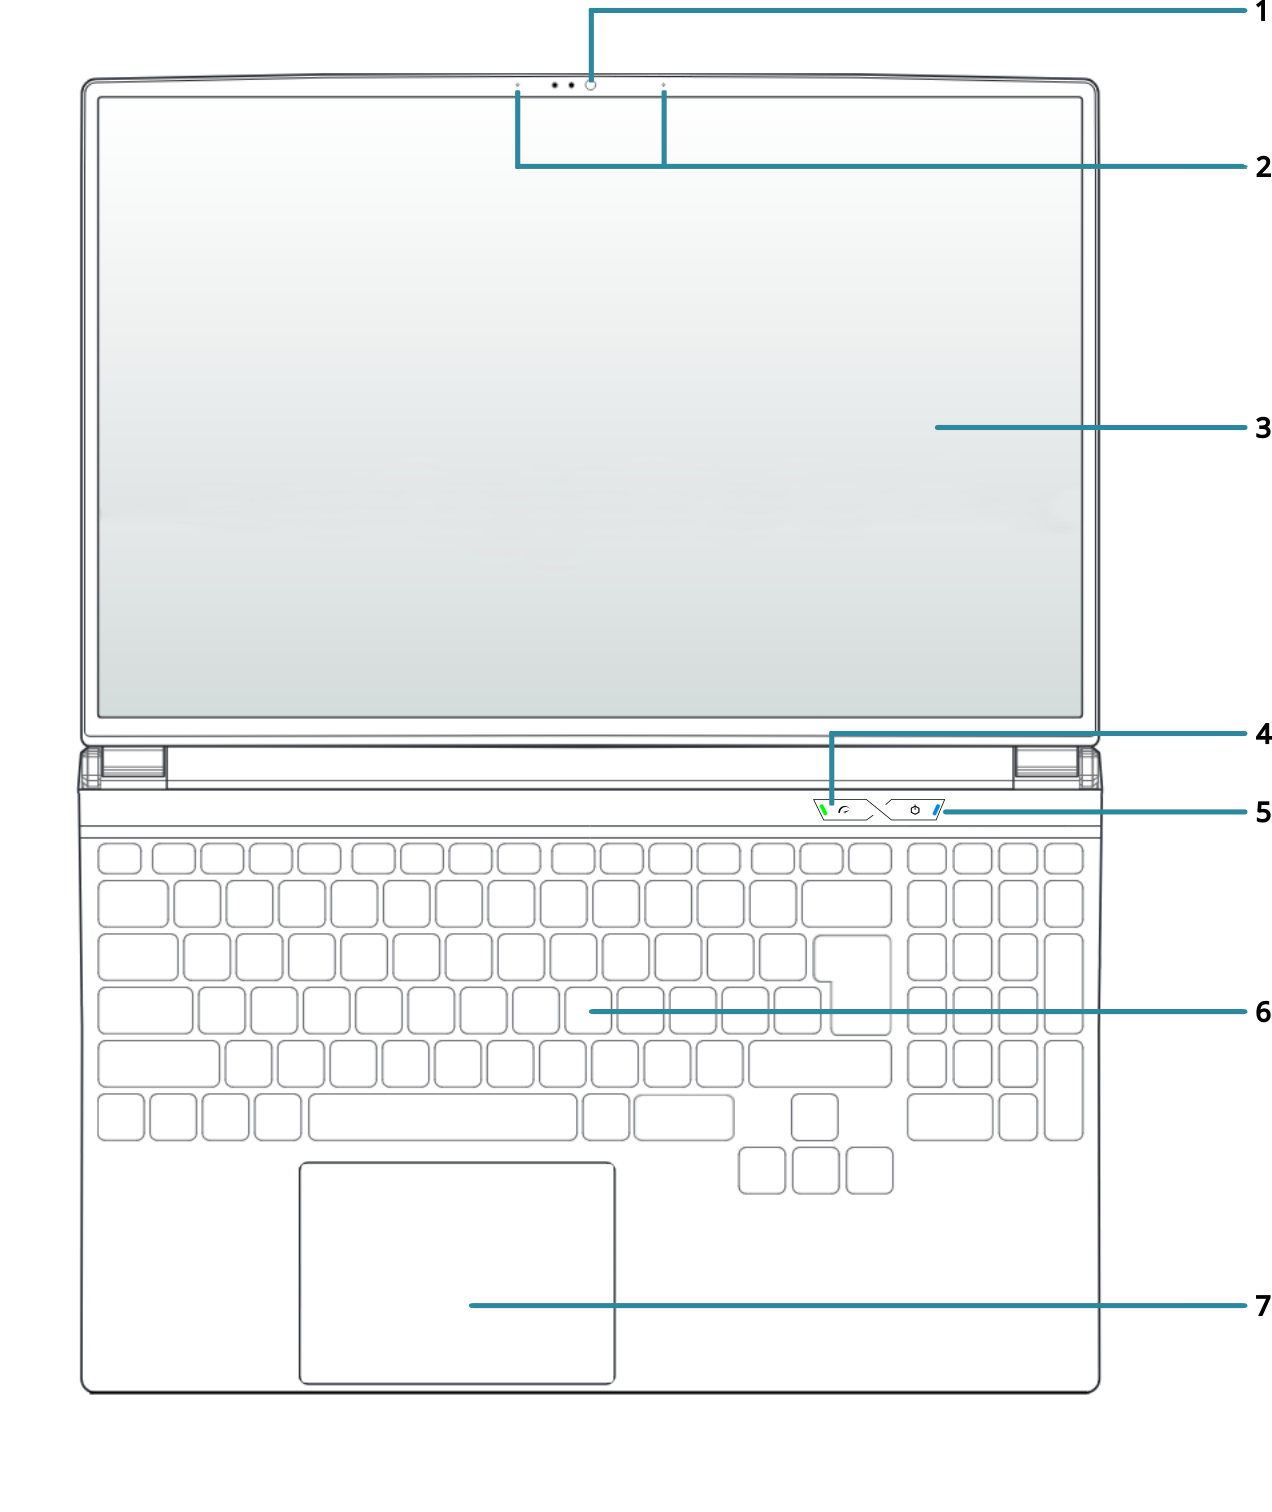
FRONT DIAGRAM |
| 1. Camera + IR with physical blocking |
| 2. Noise-canceling microphones |
| 3. Display LCD IPS 15.3" 16:10 120Hz |
| 4. Working modes button |
| 5. On/Off Button |
| 6. Keyboard |
| 7. Touchpad |

| REAR DIAGRAM |
| 8.HDMI 2.1 [iGPU] |
| 9. UBC-C 4.0 Thunderbolt4 [40Gbps] + Power Delivery + DP 1.4 |
| 10. DC in [240W] |
| 11. Mini DisplayPort 2.1 |
| 12. HDMI 2.1 [dGPU] |
| 13. Ventilation grid |


| SIDE DIAGRAMS |
| 14. RJ45 [1Gbps] |
| 15. USB-A 3.2 Gen1 [5Gbps] |
| 16. USB-C 3.2 Gen2 [10Gbps] + Power Delivery + DP 1.4 |
| 17. Audio Jack combo |
| 18. SD/SDHC/SDXC Card Reader |
| 19. USB-A 3.2 Gen1 [5Gbps] |
| 20. USB-A 3.2 Gen1 [5Gbps] |
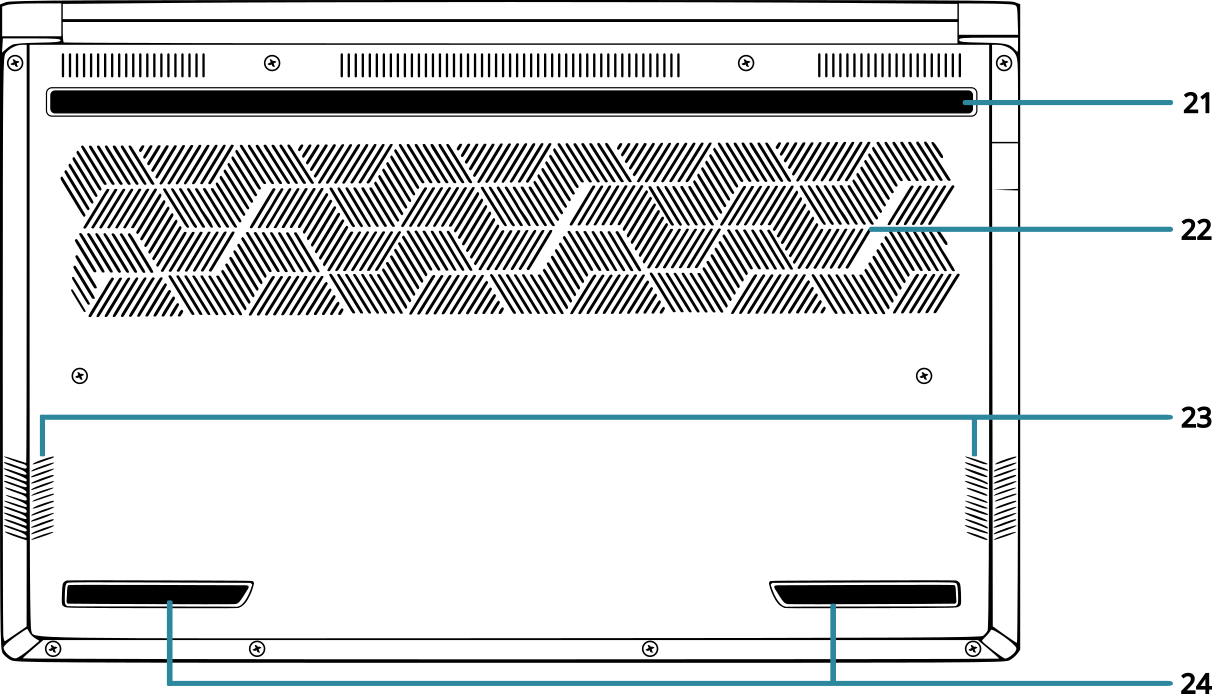
| REAR DIAGRAM |
|
21. Upper rear legs
|
| 22. Rear ventilation |
| 23. Speakers |
| 24. Lower rear legs |
PACKAGE CONTENT
FIRST STEPS
To turn on the computer, hold down the power button for 1 second and release it, located on the upper right side.
If the distribution you have chosen allows OEM installation (no user creation), it is time for you to create your username and password and set up your network.
In case the chosen distribution does not allow OEM installation, the user and password is slimbook, in addition, if the root user is enabled or has requested disk encryption, his password is also slimbook, change it to a secure one!
FUNCTIONS KEYS
| DESCRIPTION | |
| Fn + F1 - Sleep Mode | Fn + F7 - Increase Keyboard Backlight |
| Fn + F2 - Enable / Disable SUPER key | Fn + F8 - Mute Sound |
| Fn + F4 - Switch Display Output | Fn + F5 - Decrease Volume |
| Fn + F4 - Flight mode ON/OFF | Fn + F6 - Increase Volume |
| Fn + F5 - Enable / Disable Touchpad | Fn + F11 - Decrease Brightness |
| Fn + F6 - Decrease Keyboard Backlight | Fn + F9 - Increase Brightness |
To access the "Boot menu": Press the F7 key repeatedly after turning on the computer.
BATTERY
Try not to discharge the battery from 100% to 0% directly; instead, aim to use the battery within an intermediate range between both extremes, as it experiences less stress (20-80%). Try to keep it above 20%.It is also recommended to connect the device to power only when charging and not to leave it always connected.
Avoid constantly connecting and disconnecting the adapter every few minutes. Once the charging cycle is established, it's best not to interrupt it, thereby reducing battery degradation.
For more information on this topic, please check our blog:
Tips: Battery Care
|
STATUS INDICATOR |
CHARGE STATUS |
| LED * | Battery charging |
| LED * | Low battery |
| LED * | LED off Fully charged |
WORK PROFILES
It can also be modified from the BIOS -> Advanced -> Operating Mode itself.
These modify the TDP values and the fan speed table to make it quieter or more powerful.
If you want the system to notify you of the change with a message in notification mode, you must have Slimbook Service installed.
| WORK PROFILES WITH ORIGINAL CHARGER | |
| ENERGY SAVER (LED GREN) | Reduced TDP for increased battery level and quiet profile |
| BALANCED (LED BLUE) | Recommended mode for power and battery balance |
| PERFORMANCE (LED RED) | Increases TDP for heavy-duty tasks, but reduces battery level |
| TDP CPU VALUES WITH ORIGINAL 250W CHARGER - PL1, PL2, PL4 * | |
|
ENERGY SAVER |
45W - 45W - 65W |
| BALANCED | 54W - 54W - 65W |
| PERFORMANCE | 100W - 100W - 105W |
| TGP GPU VALUES WITH ORIGINAL CHARGER 250W - PL1, PL2, PL4 * | |
| ENERGY SAVER | Nvidia Whisper |
| BALANCED | 115W |
| PERFORMANCE | 140W |
| TDP CPU DYNAMIC VALUES WITH ORIGINAL 99WH BATTERY - PL1, PL2, PL4 * | |
| Normal 90%~100% | In Development |
| Normal 70%~89% | In Development |
| Normal 31%~69% | In Development |
| Normal 0%~30% | In Development |
PL1 (STAPM) – Sustained Thermal and Power Management
PL2 (sPPT) – Short-term Package Power Tracking
PL4 (fPPT) – Fast Package Power Tracking
| TGP GPU DYNAMIC VALUES WITH ORIGINAL 99WH BATTERY | |
| Normal 90%~100% | In Development |
| Normal 70%~89% | In Development |
| Normal 31%~69% | In Development |
| Normal 0%~30% | In Development |
RECOMMENDATIONS
Do not use your computer when the ambient temperature is above 35°C.
Its recommended use is in ambient temperatures between 15°C and 30°C below these temperatures, the system may experience startup delays, and above them, it may cause instability and/or sudden shutdowns.
Try to keep vent holes clean and unobstructed.
Use appropiated protection to carry the computer, avoid crushings and try not to place objects such as the charger over or under it.
It is recommended to have
Slimbook Service installed if yo use Linux, we hace a notifications section in wich we publish new BIOS updates and news relevant to your model.
MAINTENANCE
Thermal paste manufacturers only give 1 year warranty, so you should change it approximately every 1-2 years for proper maintenance.
If you need help during the process, you can follow this tutorial:
How to replace thermal paste
To open your laptop, you can follow this
link where we have some step by step video tutorials on how to do it.
**You do not lose the warranty for opening the laptop, but you do lose it if you cause any damage because of it. Therefore, although you can open the laptop, do not open it if it is not necessary and do not do it during the first months of use, to test that everything works properly in a while**.
If you have little experience and you want one of our technicians to perform the maintenance, you can contact us through the contact form at support contact form to get a budget.
SOFTWARE, DRIVERS AND FIXES
If you have reinstalled the OS in your device, you would need to add our package repository .
The packages for this laptop are: slimbook-meta-common, slimbook-meta-creative.
If your desktop environment is Gnome or Plasma, you will need to install its corresponding meta packages: slimbook-meta-gnome y slimbook-meta-plasma, respectively.
More information about the meta-packages here.
WHAT DO I DO WHEN MY LAPTOP HAS A PROBLEM?
or Rule out RAM failure with Memtest86+These tutorials may be helpful in identifying the problem.
If your device does not wake up from sleep, it might be that the graphics card option in the BIOS is in dGPU mode. At the moment, only hybrid mode (MSHybrid) wakes up from sleep correctly.
If your Slimbook needs to be serviced by a technician in or out of warranty, open a ticket at:
Support