Updating the BIOS/UEFI and EC (Embedded Controller) of your Slimbook can be beneficial for several reasons. Firstly, BIOS updates often enhance compatibility with newer hardware, ensuring optimal performance when incorporating new components. Additionally, these updates can address stability and performance issues, providing a smoother and more efficient experience.
Another reason to update the BIOS and EC is to correct potential security vulnerabilities, improve battery efficiency, charging, fan profiles, power management, etc.
We do not recommend this upgrade unless absolutely necessary, as you may void your warranty if it fails.
The process takes approximately 10-15 minutes. Before starting, you will need to have several things prepared:
1. A USB storage device of any size formatted in FAT32.
- If you don't know how to format a USB in FAT32, you can follow this tutorial.
2. Have at least 40% battery remaining.
3. Know the model, generation, and CPU of your Slimbook.
There are various ways to find out the exact model:
- You can check the model and processor from the BIOS or the operating system.
- Check your order or invoice.
- Directly inquire at [email protected]
4. Disable "Secure Boot from the BIOS. To access the BIOS, repeatedly press F2 or (DEL/DELETE on some models) when turning on your computer. You can also follow this tutorial. Once you know the model, you can download the appropriate BIOS by searching Downloads
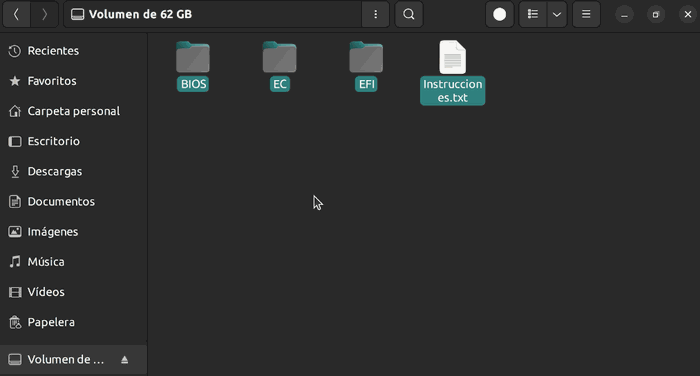
After downloading the .zip, extract it and move all the files to the root of the USB.
Important note: Remember to have the original power charger connected to the laptop and not disconnect it until the process is complete.
Steps for the update:
1. Completely power off your Slimbook.
2. Press the power button and then press F7 or (F10 in some models) repeatedly until the USB storage selection screen appears. Choose your USB and press Enter.

3. In this screen, select the USB storage (it can be fs0: fs1:... in this case fs1: it should be identified by "Removable HardDisk") and launch the command: fs1: (the keyboard will be configured with the English or American layout, so to type the colon (:) you must press Shift+Ñ if you have a Spanish keyboard or Shift+"key to the right of the L" in any other keyboard layout).
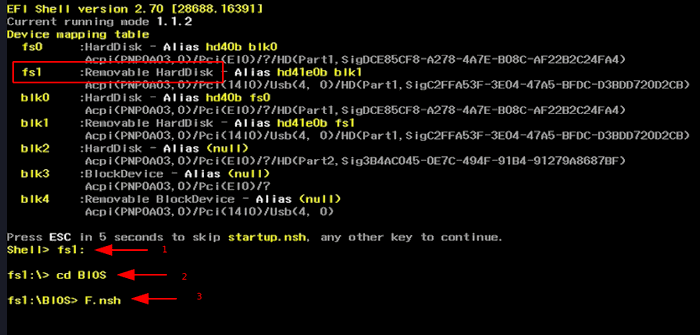
4. Once inside the USB storage drive, access the BIOS folder with the command: cd BIOS
IMPORTANT, ONLY FOR ELEMENTAL MODELS WITH INTEL 12-13GEN
Before proceeding with the BIOS update we must run the "MeSet.efi" file, if this file is not in the folder you have downloaded it is not necessary to run it. To run this file simply launch MeSet.efi and the computer will reboot.
5. Then, when inside the BIOS folder, start the update with the command: F.nsh
6. Wait for your Slimbook to restart.
7. Repeat the same steps, but this time with the EC folder, wait for it to finish and restart. Once back to the EFI Shell screen after the EC update, you can safely power off by pressing the ON/OFF button, and you can remove the USB and power.
Note: It is normal for the fans to run at 100%, but don't worry; the EC update is faster.
Note 2: If the EC folder contains two directories you can list the folders with "ls" without quotes, once listed you should be able to see the folders in the current path, if your BIOS has different folders like "GR" or "SP-UK-US-FR" you have to access the correct one for your Slimbook. "GR" stands for German region, SP-UK-US-FR stands for Spanish-UnitedKingdom-UnitedStates-France.
And there you have it, your BIOS and EC are now updated to the latest available version.
Remember that if you have any doubts during the update, you can send us an email with your question to [email protected]