Often, we want our Kymera to be quieter—whether because we use it at night or because the cooling system efficiently keeps the processor cool, reducing the need for high fan speeds. In this guide, we’ll walk you through how to customize and silence your Kymera across different BIOS interfaces, including Asus, Gigabyte, MSI, and more. We will continue updating this guide over time.
Expand to learn how to adjust fan speed:
1. Restart your Kymera and repeatedly press the designated key to access the BIOS. This is usually F2, F10, or Delete, but it may vary depending on your motherboard. The correct key is typically displayed on the screen during startup, so keep an eye out, as this screen disappears quickly. Once inside, you should see a screen like this:
2. Navigate to the fan control settings. Look for a section labeled "Hardware Monitor," "PC Health," "Fan Control," or, in this case, "Fan Info." The exact name and location may vary depending on your motherboard model. - To modify the fan profile, click on the gear icon using your mouse:
 3. Adjust the fan speed settings. Depending on your motherboard and BIOS version, you may have different options available. Typically, you can choose between predefined profiles (such as Silent, Performance, etc.) or manually set the fan speed.
 - In this guide, we’ll configure the fan manually for optimal silence. To do this, select PWM mode instead of Auto:
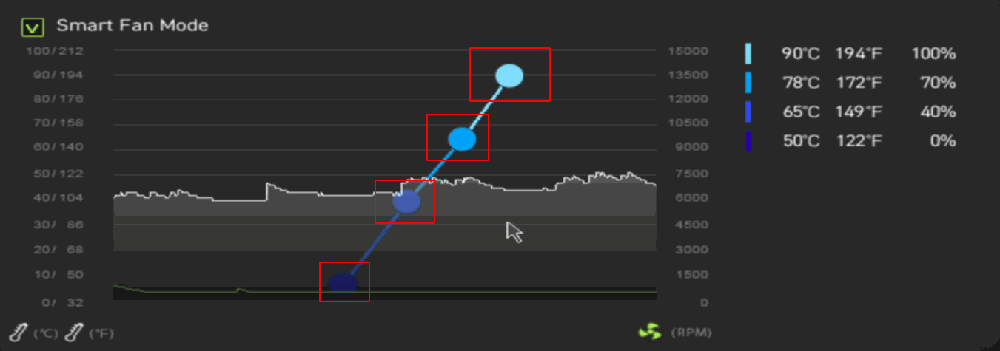
- Adjust the values using your mouse to achieve a setup similar to the example shown. Pay attention to the values on the right and try to match them as closely as possible. These settings are flexible—you can fine-tune them to your preference. If you notice your processor heating up too much, increase the values slightly so the fans spin faster.
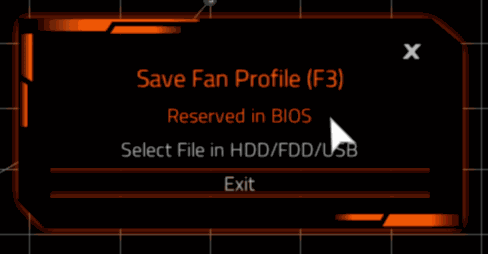
 4. Save and apply your changes. After making the necessary adjustments, close the settings window (by clicking the X in the top-right corner) and ensure you save the changes in the BIOS. This is usually done by pressing F10 or following the on-screen instructions. Finally, restart your Kymera for the new settings to take effect.
1. Restart your Kymera and repeatedly press the designated key to access the BIOS. This is usually F2, F10, or Delete, but it may vary depending on your motherboard. The correct key is typically displayed on the screen during startup, so keep an eye out, as this screen disappears quickly. Once inside, you should see a screen like this:

2. Locate the fan control settings. Look for a section related to fan configuration or fan speed management. The exact name may vary depending on your BIOS version and Gigabyte motherboard model. In our case, it is called "Smart Fan 6."

3. Adjust the fan speed settings. Here, you should see options to control fan speeds—either by setting specific values or selecting predefined profiles such as "Silent" or "Normal." Depending on your BIOS version, you may be able to adjust each fan individually or apply global settings.

4. Select the desired fan profile. In our case, we will leave it on Silent, but as shown in the image above, you can also switch to Manual mode and customize fan speed and temperature thresholds to your preference.

5. Save and apply your changes. After making the desired adjustments, ensure you save the changes before exiting the BIOS. This is usually done by pressing F10 to confirm and exit, though the exact instructions will be displayed on the screen.
In development
Keep in mind that BIOS interfaces and options may vary depending on your motherboard model and BIOS version. For precise instructions tailored to your specific motherboard, refer to the user manual or search online for detailed guidance.